From file to viewport in a few steps.
- 1Enable WallGS
In Unreal, open Edit → Plugins, find WallGS, enable it, and restart the editor if Unreal asks.
- 2Import your file
Drag a
.plyor.sogfile into the Content Browser, or use Import. Choose Native Asset or Reference Original File in the new dialog, then press Import. The comparison below will help you decide. - 3Add it to the level
Drag the new asset from the Content Browser into the viewport. It becomes a WallGS actor that you can move, rotate, and scale like any other Unreal actor.
For PLY, use a standard binary little-endian 3D Gaussian Splat file. For SOG, WallGS supports the current v2 format.
You can keep TSR/TAA and Depth of Field. Leave Rendering → Fix Depth of Field Smearing enabled for WallGS motion-vector integration. The old recommendation to switch every project to FXAA no longer applies.
On Win64, Forward Shading is not currently supported. Use Unreal's deferred rendering path. Android automatically uses WallGS's Vulkan mobile path.
Where should your splats live?
Drag a PLY or SOG into the Content Browser. The new dialog asks how to store it. Both routes create an asset, but one holds prepared splat data and the other holds a reference to your source. Native Unreal assets use the .uasset extension.
Native Asset
Choose this for a self-contained project. WallGS decodes and prepares the source during import, then saves it as native data. The original file is no longer needed to render or package the asset. This is straightforward to share, but the native asset can be much larger than a compressed SOG.
Reference Original File
Choose this to save project disk space. WallGS saves a small source descriptor and decodes the original PLY or SOG when loading it for rendering. Keep the file available at its recorded path. Its compressed disk size is preserved; decoded CPU data and GPU buffers still require memory.
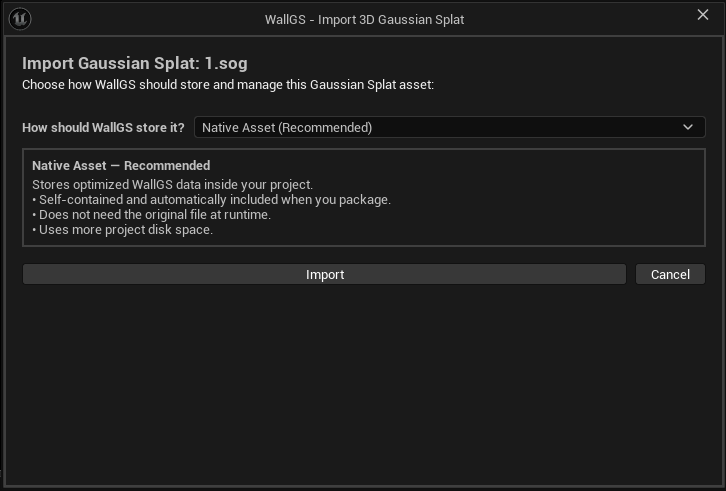
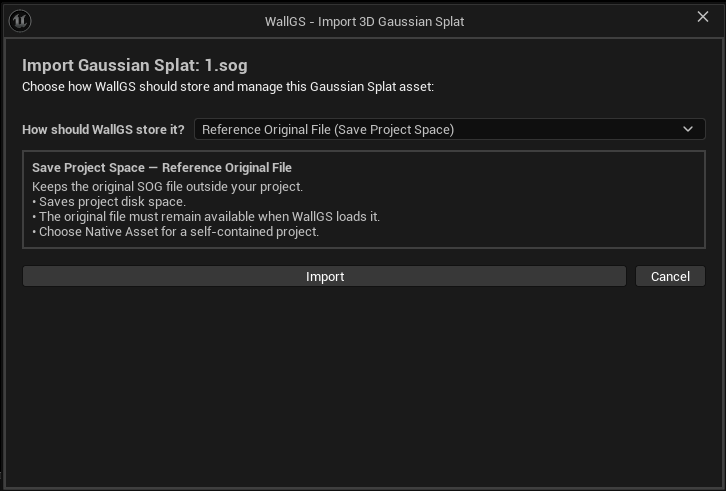
A 500 MB SOG can expand into a much larger native asset because compressed storage and prepared render data are different representations. There is no fixed expansion ratio. Reference mode avoids saving the expanded data in your project; it does not guarantee a 500 MB memory footprint.
Working with a team
For a static referenced scan, copy the original into a stable project folder yourself. Update the descriptor's Source Path to a project-relative path such as Content/WallGSRaw/Scans/room.sog, then commit the descriptor and raw file. The automatic Keep a copy with this project checkbox belongs to referenced 4DGS sequences; it is not in the single-file dialog.
Bring a capture to life.
A WallGS 4DGS sequence is an ordered set of PLY or SOG frames. Import them as one asset, place it in the level, then control playback.
- 1Import the frames together
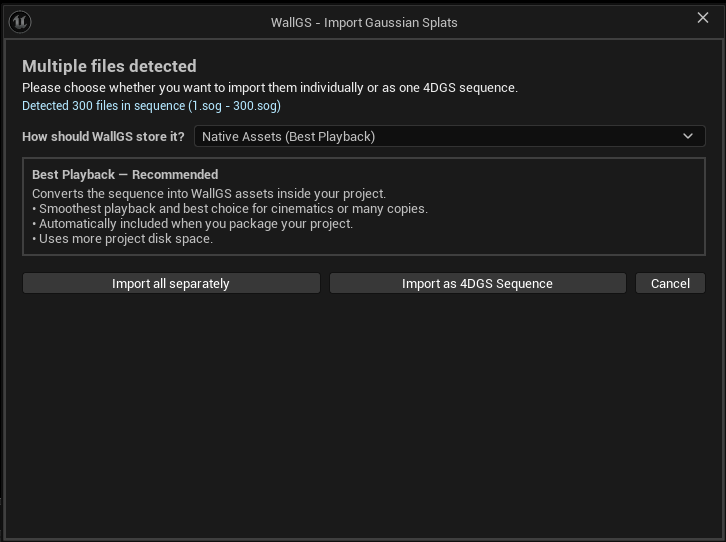
Select your numbered frame files and drag them into the Content Browser. Check the detected file count and range. WallGS puts the frames in numeric order.
- 2Choose storage
Native Assets (Best Playback) prepares embedded frames for smooth playback, cinematics, and many copies. Reference mode saves project space by reading and decoding source frames as needed. A fast drive helps, but decoding also costs CPU time.
- 3Import as 4DGS Sequence
Press this button for animation. Import all separately creates independent static scans instead. Drag the sequence asset into the level.
- 4Set the timing
Set the sequence asset's Frame Rate to match your capture. On the actor, enable Auto Play and choose Once, Loop, or Ping Pong. Play Rate changes speed; 1 is the authored speed.
Keep the source frames with your project
In reference mode, enable Keep a copy with this project to copy the original frames under Content/WallGSRaw/Managed. Their source format stays intact. Commit those files, the sequence asset, and Config/WallGSExternalSequenceStaging.manifest. Leave it off to avoid an extra project copy; the packaging computer must still reach the original folder.
Sequencer and movie rendering
Add the actor to Sequencer and key Playback Time in seconds, or Current Frame for exact frame selection. Turn off Auto Play while the timeline controls it. Frames are discrete; WallGS does not blend adjacent captures. Keep Synchronous Seeking enabled for exact seeks and movie rendering.
Start with Smart caching
Referenced sequences default to Smart cache mode. It retains a playback window within available RAM and the Smart Cache Limit MB ceiling. The default ceiling is 8192 MB, not a promise to allocate that amount. Check Estimated Sequence Memory MB, Effective Cache Memory MB, and Effective Cached Frames to see the actual plan.
Manual mode exposes Max Cached Frames and Cache Memory MB. GPU buffers and decode scratch require additional memory. Preserve Frame Order waits for frames that are not ready. Preload Whole Sequence When It Fits can reduce steady playback decoding when safe RAM permits it, at the cost of startup loading and more memory. If playback stalls, try native storage before increasing every cache limit.
Your splat actor.
After placing an asset, select the actor and use its Gaussian Splat component in the Details panel. Transform controls work as they do for every Unreal actor. The controls below change how the selected asset is displayed.
Splat Asset
The native asset this actor displays. Referenced actors use Source; animated actors use Sequence Asset. Select the corresponding component to find its settings.
Splat Scale
A separate size multiplier for the splat itself. Keep it at 1.0 for the imported size; increase or decrease it when you need a fast visual fit.
Enabled
Shows or hides the splat actor without removing it from the level. Useful for quick comparisons.
Make the scan look right.
WallGS works with Unreal’s normal post-processing pipeline. Use the actor Appearance controls for Exposure, Contrast, Saturation, and Gamma on this scan. A Post Process Volume controls the scene-wide final image; SH controls adjust view-dependent color.
SH Degree 0–3
Controls view-dependent detail, such as subtle highlights that move as you move the camera. 3 keeps the most information. Lower it to reduce work or to make the look more neutral.
SH Strength 0–2
Sets how strongly view-dependent color is visible. Reduce it if reflections or changing colors feel distracting; set it to 0 for a steadier, diffuse look.
For brighter or darker splats, color grading, contrast, gamma, or tone mapping, add and configure an Unreal Post Process Volume. This gives WallGS the same scene-wide final-image controls as the rest of your level.
Let Unreal light your scan.
Your capture already contains lighting. Relighting lets you blend that appearance with Unreal lights. Begin with a single light so you can see the result of each adjustment.
- 1Enable Relighting
Select the actor and expand Relighting. Enable it and start with Automatic Normals; no extra asset is needed.
- 2Try Relighting Amount 1
At 1, scan colors act as surface colors under Unreal lighting: colored lights tint them and unlit areas darken. Lower the amount to keep more captured lighting. At 0, you retain the original appearance.
- 3Use a proxy when it helps
For static 3DGS, select Proxy Mesh, assign a matching Static Mesh, enable Preview Proxy Mesh, and align Proxy Transform. The transform is relative to the splat component. 4DGS always uses Automatic Normals.
Directional, point, spot, rect, and sky lights use deferred lighting. Soft subjects, thin surfaces, and silhouettes can show less stable automatic shading. Proxy Match Distance limits the distance from splats to the proxy; unmatched splats fall back to automatic normals. The proxy preview is editor-only. Cast Shadows lets the hidden proxy cast shadows onto other geometry.
Relighting requires deferred rendering, including deferred PC VR. Mobile and forward-shaded views retain their existing rendering path.
Reflections and Depth of Field
Rendering → Lumen Screen Traces adds visible splats to reflections on opaque surfaces, most clearly on smooth reflective meshes. This is screen-space: off-screen splats cannot appear through this bridge.
Keep Fix Depth of Field Smearing enabled for TSR/TAA motion vectors and persistent Depth of Field. Disabling it uses a faster late composite, but Depth of Field no longer persists on splats and mesh boundaries can alias. Compare its GPU cost in your scene.
Keep the parts you need.
Add a WallGS Culling Volume from Place Actors. Set its Gaussian Splat Actor target to your native or referenced static scan, then move, rotate, and resize its box around the region.
Hide Inside removes splat centers inside the box. Keep Inside keeps the enclosed region. Toggle Enabled to compare. Up to eight volumes can affect one actor. Attach the volume to the scan after positioning if later actor moves should carry the cut with it. Soft Gaussian edges can extend past the box because clipping tests splat centers.
Make a native cut permanent
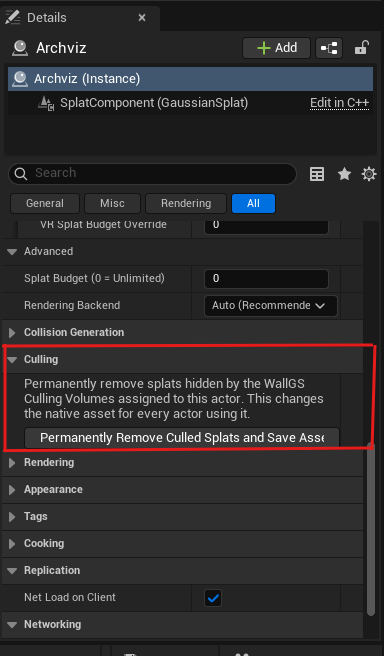
A native static actor exposes Culling → Permanently Remove Culled Splats and Save Asset. Duplicate or back up the asset first: this modifies the shared native asset for every actor using it. Referenced and 4DGS actors do not offer this action. Keep the volumes reversible while you experiment.
A WallGS Collision Volume is a separate tool that limits collision generation. Use the collision guide below for that workflow.
Spatial LOD, without the guesswork.
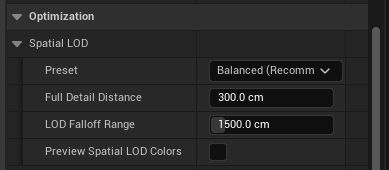
Spatial LOD is WallGS’s general-purpose optimization path. It keeps nearby areas at full quality and smoothly reduces distant splats according to a simple distance profile.
Preset
Start with Balanced. Choose High Quality for more detail, Better Performance or Maximum Performance for stronger distant reduction, or Off for full density. The same presets use stronger reductions for 4DGS.
Distance and falloff
Full Detail Distance preserves nearby density (default 300 cm). LOD Falloff Range sets how gradually reduction grows beyond it (default 1500 cm). Increase these to retain detail farther away; shorten them to save work sooner.
Preview Spatial LOD Colors
Color-codes the effective distance reduction so you can see where each part of the scene sits in the profile. Toggle it at runtime from Blueprint for interactive demos.
Rendering Backend
Auto selects the best supported Win64 geometry path and safely falls back to the vertex-shader path. Android always uses the Vulkan mobile vertex path.
On animated actors, Reduce 4DGS Frame Rate at Distance optionally skips distant source frames to reduce decode, upload, and sorting work. Speed and duration stay the same, but distant motion becomes less smooth. Use stat WallGS to check when it is active.
PCVR and standalone-headset controls now live together in the dedicated VR group. Continue below for recommended setup and an explanation of how the different budgets interact.
Full-quality splats, tuned for two eyes.
PCVR is a supported WallGS target. The renderer shares stereo work automatically, selects the best available Win64 geometry path, and provides spatial controls that preserve nearby and central detail while reducing less useful work.
Recommended PCVR setup
- 1Use Deferred Rendering
WallGS does not currently support Forward Shading on Win64. Keep Unreal’s deferred renderer enabled.
- 2Enable Instanced Stereo
In Project Settings, enable Instanced Stereo for your desktop VR project. WallGS automatically shares compatible sorting work between both eyes.
- 3Leave Rendering Backend on Auto
Auto uses the Mesh Shader path when the active RHI and GPU support it, then safely falls back to the Vertex Shader path when they do not.
- 4Start with the defaults
Use the default Spatial LOD profile, Balanced VR Edge Optimization, and VR Splat Budget Override 0. Tune only after testing in-headset.
Reduces WallGS splat density toward each eye edge. It does not change headset or OpenXR foveation settings.
Start with Balanced. Light and Moderate retain more edge detail; Performance saves the most work. Off disables WallGS edge thinning.
Places a spatially distributed cap on stereo VR rendering without changing non-VR views.
Keep it at 0 to use the full cooked asset. A positive value applies a VR-only ceiling.
Keeps full density around the viewer, then progressively reduces distant splats across VR and non-VR views.
Increase Full Detail Distance or LOD Falloff Range if detail simplifies too early, or select High Quality.
Color-codes the effective distance LOD: green is full density, yellow is approximately half, and red is approximately quarter density.
Use it while tuning, then turn it off before shipping.
Share Sort Between VR Eyes is always enabled and intentionally hidden. There is nothing users need to configure.
One asset workflow, a dedicated mobile renderer.
WallGS supports Android phones and standalone OpenXR headsets through its Vulkan mobile rendering path. You import and place the same Gaussian Splat assets used on Windows; WallGS selects the Android renderer automatically.
Android Vulkan
OpenGL ES is not a WallGS backend. The desktop Rendering Backend setting is ignored on Android.
Meta Quest
Quest 2, Quest Pro, Quest 3, and Quest 3S are supported through OpenXR.
Mobile Multi-View
Supported and recommended for standalone VR. Sequential stereo is also supported.
First Android package
- 1Use the mobile Vulkan path
Enable Support Vulkan and disable Vulkan Desktop/SM5 for the Android target.
- 2Enable Mobile Multi-View for VR
This is the recommended stereo path for standalone headsets and ensures both eyes use the intended mobile rendering configuration.
- 3Choose the packaged asset size
Double-click the Gaussian Splat asset and set Android Max Splat Override. The default is 2 million splats.
- 4Package Android ASTC
Cook and test on the target device. Performance and thermals must be judged on-device rather than from the Windows viewport.
Android Max Splat Override
Controls how many spatially distributed splats are placed in every Android package, including phone and standalone VR builds. 0 packages the complete source asset. Changing it requires cooking and packaging again.
VR Splat Budget Override
Optionally lowers the runtime ceiling only in VR. It works inside the cooked Android maximum and does not change non-VR views.
Android Max Splat Override also applies to non-VR Android apps. The controls inside the VR group activate only for stereo VR views.
Make the scan usable.
Gaussian splats are visual data. WallGS can turn that data into a Static Mesh with complex collision, so your scan can support traces, placement, physics queries, and player movement.
- 1Select the splat actor
Choose the WallGS actor in the viewport or Outliner.
- 2Choose a preset
In Collision Generation, choose Indoor, Outdoor, or Object. Begin with the preset that best matches the scan.
- 3Generate Collision
Press Generate Collision. WallGS creates a Static Mesh asset and attaches it to the actor. You can find the generated asset beside the source splat (or under
/Game/WallGS_Collisionwhen needed).
The balanced default for rooms, corridors, and architectural scans. Uses 10 cm voxels to preserve walls and walkable surfaces.
For large environments. Uses a coarser 25 cm grid to cover more ground with a lighter mesh.
For props and smaller captures. Uses a fine 5 cm grid to hold onto more local shape.
Place one or more WallGS Collision Volume actors and resize their box components before generating collision. When volumes exist, WallGS generates only inside those boxes—ideal for limiting a large scan to the playable space.
When a preset needs help.
Changing any individual collision setting switches the preset to Custom. Make one small adjustment at a time, regenerate the mesh, and test the result in the viewport.
The size of each block used to build the collision mesh.
Lower for more detail; raise for faster, simpler collision.
How far each splat contributes to the collision shape.
Raise it to close thin gaps; lower it if surfaces become too thick.
Ignores splats that are too transparent.
Raise it to remove floating noise; lower it when genuine surfaces are missing.
How much splat presence is needed before a voxel becomes solid.
Raise it to make collision more selective; lower it to fill weak or sparse scan areas.
How many cleanup passes try to bridge small holes.
Increase when surfaces are broken; reduce if gaps are being closed incorrectly.
Extra repair for broad, flat surfaces such as floors.
Increase for patchy floors; lower it if unwanted bridges appear.
Removes disconnected pieces below this size.
Raise it to remove noise; lower it to keep small valid objects.
A safety limit on the collision generation grid.
Raise it only for very large or very fine captures; use volumes or larger voxels first.
Take the source with you.
Native assets
Save the assets and level, then cook and package normally. Assets used by your level are self-contained. The native asset's Android Max Splat Override is a cook-time limit; save and recook after changing it.
Referenced 4DGS
The importer records staging in Config/WallGSExternalSequenceStaging.manifest. Build runtime dependencies include the frames. Copied sequences travel with the project; external sequences need the original folder on the packaging machine. Rebuild after adding or moving sources.
Referenced static 3DGS
The single-file importer saves a source path, without the sequence staging manifest. For a portable package, copy the source under Content, set a project-relative Source Path, and include its folder using Additional Non-Asset Directories to Package. Test on a machine without access to your original drive.
Runtime loading
Blueprint exposes Load Gaussian Splat PLY, Load Gaussian Splat SOG, and the sequence component's Load Referenced 4DGS Directory. They use transient data. Input files must be accessible on the target device; handle the returned error when a load fails.
Referenced sources are decoded at runtime, rather than reduced by the native asset's Android cook-time limit. Choose source sizes that fit the device memory. Spatial LOD and runtime budgets reduce rendering work; the full source still needs decoding.
Coming from an older project?
Existing native assets do not automatically become references. Keep them, or import the original source again with Reference mode. Older saved LOD curves are retained for compatibility; new editing uses preset controls. Relighting remains optional. Recheck saved actor settings and packaged output after upgrading.
A few good defaults.
My scan is too heavy.
Choose Better Performance, then shorten Full Detail Distance or LOD Falloff Range if needed. For stereo VR, you can also use VR Splat Budget Override.
My collision is too rough.
Try the Object preset for a small asset, or reduce Voxel Size one step at a time. Smaller voxels take longer and create more geometry.
My floor has holes.
Use the Indoor preset first. If needed, lower Density Threshold slightly or add a Planar Cleanup Pass, then regenerate.
I only need collision in one room.
Add and scale a WallGS Collision Volume around that room before generating. It keeps the result focused and avoids processing the whole scan.
Is VR supported?
Yes. PCVR and standalone Android OpenXR are supported. WallGS includes automatic shared-eye sorting, foveated splat reduction, a spatial VR budget, and distance-based LOD.
Why does Android still look simplified?
Check the asset’s Android Max Splat Override, the Spatial LOD profile, and—when testing in stereo—the VR Splat Budget Override and VR Edge Optimization.
Why did my Android asset limit not change?
Android Max Splat Override is a cook-time setting. Save the asset and create a fresh Android package after changing it.
Only one eye renders on Quest.
Enable Mobile Multi-View in Project Settings, rebuild the Android package, and confirm the project is using the Vulkan mobile path.
Edge resolution is unchanged.
Native fixed-foveation resolution depends on the active XR runtime and plugin. WallGS peripheral splat reduction can still operate through VR Edge Optimization.